· 4 min read
Lorenzo Sciandra

In 2018 the React Native Community made a number of changes to the way we develop and communicate about React Native. We believe that a few years from now we will look back and see that this shift was a turning point for React Native.

A lot of people are excited about the rewrite of React Native's architecture, widely known as Fabric. Among other things, this will fix fundamental limitations in React Native's architecture and will set up React Native for success in the future together with JSI and TurboModules.

The biggest shift in 2018 was to empower the React Native Community. From the beginning, Facebook encouraged developers from all around the world to participate in React Native's open source project. Since then, a number of core contributors emerged to handle, among other things, the release process.

These members took a few substantial steps towards making the whole community more empowered to shape the future of this project with the following resources:

react-native-releases 📬

This repository, created in January, serves the dual purpose of allowing everyone to keep up the new releases in a more collaborative manner and opened the conversation of what would be part of a certain release to whomever wanted to suggest a cherry-pick (like for 0.57.8 and all its previous versions).

This has been the driving force behind moving away from a monthly release cycle, and the "long term support" approach currently used for version 0.57.x.

Half of the credit for reaching these decisions goes to the other repository created this year:

discussions-and-proposals 🗣

This repository, created in July, expanded on the idea of a more open environment for conversations on React Native. Previously, this need was handled by issues labelled For Discussion in the main repository, but we wanted to expand this strategy to an RFC approach that other libraries have (e.g. React).

This experiment immediately found its role in the React Native lifecycle. The Facebook team is now using the community RFC process to discuss what could be improved in React Native, and coordinate the efforts around the Lean Core project - among other interesting discussions.

@ReactNativeComm 🐣

We are aware that our approach to communicate these efforts has not been as effective as we would have liked, and in an attempt to give you all an easier time keeping up with everything going on in the React Native Community (from releases to active discussions) we created a new twitter account that you can rely on @ReactNativeComm.

If you are not on that social network, remember that you can always watch repositories via GitHub; this feature improved these past few months with the possibility of being notified only for releases, so you should consider using it anyway.

What awaits ahead 🎓

Over the past 7-8 months, core contributors enhanced the React Native Community GitHub organization to take more ownership over the development of React Native, and enhance collaboration with Facebook. But this always lacked the formal structure that similar projects may have in place.

This organization can set the example for everyone in the larger developer community by enforcing a set of standards for all the packages/repos hosted in it, providing a single place for maintainers to help each other and contribute quality code that conforms to community-agreed standards.

In early 2019, we will have this new set of guidelines in place. Let us know what you think in the dedicated discussion.

We are confident that with these changes, the community will become more collaborative so that when we reach 1.0, we will all continue to write (even more) awesome apps by leveraging this joint effort 🤗


I hope you are as excited as we are about the future of this community. We're excited to see all of you involved either in the conversations happening in the repositories listed above or via the awesome code you’ll produce.

Happy coding!

· 5 min read
Héctor Ramos

This year, the React Native team has focused on a large scale re-architecture of React Native. As Sophie mentioned in her State of React Native post, we've sketched out a plan to better support the thriving population of React Native users and collaborators outside of Facebook. It's now time to share more details about what we've been working on. Before I do so, I'd like to lay out our long-term vision for React Native in open source.

Our vision for React Native is...

  • A healthy GitHub repository. Issues and pull requests get handled within a reasonable period of time.
    • Increased test coverage.
    • Commits that sync out from the Facebook code repository should not break open source tests.
    • A higher scale of meaningful community contributions.
  • Stable APIs, making it easier to interface with open source dependencies.
    • Facebook uses the same public API as open source
    • React Native releases that follow semantic versioning.
  • A vibrant eco-system. High quality ViewManagers, native modules, and multiple platform support maintained by the community.
  • Excellent documentation. Focus on helping users create high quality experiences, and up-to-date API reference docs.

We have identified the following focus areas to help us achieve this vision.

✂️ Lean Core

Our goal is to reduce the surface area of React Native by removing non-core and unused components. We'll transfer non-core components to the community to allow it to move faster. The reduced surface area will make it easier to manage contributions to React Native.

WebView is an example of a component that we transferred to the community. We are working on a workflow that will allow internal teams to continue using these components after we remove them from the repository. We have identified dozens more components that we'll give ownership of to the community.

🎁 Open Sourcing Internals and 🛠Updated Tooling

The React Native development experience for product teams at Facebook can be quite different from open source. Tools that may be popular in the open source community are not used at Facebook. There may be an internal tool that achieves the same purpose. In some cases, Facebook teams have become used to tools that do not exist outside of Facebook. These disparities can pose challenges when we open source our upcoming architecture work.

We'll work on releasing some of these internal tools. We'll also improve support for tools popular with the open source community. Here's a non-exhaustive list of projects we'll tackle:

  • Open source JSI and enable the community to bring their own JavaScript VMs, replacing the existing JavaScriptCore from RN's initial release. We'll be covering what JSI is in a future post, in the meantime you can learn more about JSI from Parashuram's talk at React Conf.
  • Support 64-bit libraries on Android.
  • Enable debugging under the new architecture.
  • Improve support for CocoaPods, Gradle, Maven, and new Xcode build system.

✅ Testing Infrastructure

When Facebook engineers publish code, it's considered safe to land if it passes all tests. These tests identify whether a change might break one of our own React Native surfaces. Yet, there are differences in how Facebook uses React Native. This has allowed us to unknowingly break React Native in open source.

We'll shore up our internal tests to ensure they run in an environment that is as close as possible to open source. This will help prevent code that breaks these tests from making it to open source. We will also work on infrastructure to enable better testing of the core repo on GitHub, enabling future pull requests to easily include tests.

Combined with the reduced surface area, this will allow contributors to merge pull requests quicker, with confidence.

📜 Public API

Facebook will consume React Native via the public API, the same way open source does, to reduce unintentional breaking changes. We have started converting internal call sites to address this. Our goal is to converge on a stable, public API, leading to the adoption of semantic versioning in version 1.0.

📣 Communication

React Native is one of the top open source projects on GitHub by contributor count. That makes us really happy, and we'd like to keep it going. We'll continue working on initiatives that lead to involved contributors, such as increased transparency and open discussion. The documentation is one of the first things someone new to React Native will encounter, yet it has not been a priority. We'd like to fix that, starting with bringing back auto-generated API reference docs, creating additional content focused on creating quality user experiences, and improving our release notes.

Timeline

We're planning to land these projects throughout the next year or so. Some of these efforts are already ongoing, such as JSI which has already landed in open source. Others will take a bit longer to complete, such as reducing the surface area. We'll do our best to keep the community up to date with our progress. Please join us in the Discussions and Proposals repository, a initiative from the React Native community that has led to the creation of several of the initiatives discussed in this roadmap.

· 2 min read

For a long time now, Apple has discouraged using UIWebViews in favor of WKWebView. In iOS 12, which will be released in the upcoming months, UIWebViews will be formally deprecated. React Native's iOS WebView implementation relies heavily on the UIWebView class. Therefore, in light of these developments, we've built a new native iOS backend to the WebView React Native component that uses WKWebView.

The tail end of these changes were landed in this commit, and will become available in the 0.57 release.

To opt into this new implementation, please use the useWebKit prop:

<WebView
useWebKit={true}
source={{url: 'https://www.google.com'}}
/>

Improvements

UIWebView had no legitimate way to facilitate communication between the JavaScript running in the WebView, and React Native. When messages were sent from the WebView, we relied on a hack to deliver them to React Native. Succinctly, we encoded the message data into a url with a special scheme, and navigated the WebView to it. On the native side, we intercepted and cancelled this navigation, parsed the data from the url, and finally called into React Native. This implementation was error prone and insecure. I'm glad to announce that we've leveraged WKWebView features to completely replace it.

Other benefits of WKWebView over UIWebView include faster JavaScript execution, and a multi-process architecture. Please see this 2014 WWDC for more details.

Caveats

If your components use the following props, then you may experience problems when switching to WKWebView. For the time being, we suggest that you avoid using these props:

Inconsistent behavior:

automaticallyAdjustContentInsets and contentInsets (commit)

When you add contentInsets to a WKWebView, it doesn't change the WKWebView's viewport. The viewport remains the same size as the frame. With UIWebView, the viewport size actually changes (gets smaller, if the content insets are positive).

backgroundColor (commit)

With the new iOS implementation of WebView, there's a chance that your background color will flicker into view if you use this property. Furthermore, WKWebView renders transparent backgrounds differently from UIWebview. Please look at the commit description for more details.

Not supported:

scalesPageToFit (commit)

WKWebView didn't support the scalesPageToFit prop, so we couldn't implement this on the WebView React Native component.

· 7 min read
Ziqi Chen

Motivation

As technology advances and mobile apps become increasingly important to everyday life, the necessity of creating accessible applications has likewise grown in importance.

React Native's limited Accessibility API has always been a huge pain point for developers, so we've made a few updates to the Accessibility API to make it easier to create inclusive mobile applications.

Problems With the Existing API

Problem One: Two Completely Different Yet Similar Props - accessibilityComponentType (Android) and accessibilityTraits (iOS)

accessibilityComponentType and accessibilityTraits are two properties that are used to tell TalkBack on Android and VoiceOver on iOS what kind of UI element the user is interacting with. The two biggest problems with these properties are that:

  1. They are two different properties with different usage methods, yet have the same purpose. In the previous API, these are two separate properties (one for each platform), which was not only inconvenient, but also confusing to many developers. accessibilityTraits on iOS allows 17 different values while accessibilityComponentType on Android allows only 4 values. Furthermore, the values for the most part had no overlap. Even the input types for these two properties are different. accessibilityTraits allows either an array of traits to be passed in or a single trait, while accessibilityComponentType allows only a single value.
  2. There is very limited functionality on Android. With the old property, the only UI elements that Talkback were able to recognize were “button,” “radiobutton_checked,” and “radiobutton_unchecked.”

Problem Two: Non-existent Accessibility Hints:

Accessibility Hints help users using TalkBack or VoiceOver understand what will happen when they perform an action on an accessibility element that is not apparent by only the accessibility label. These hints can be turned on and off in the settings panel. Previously, React Native's API did not support accessibility hints at all.

Problem Three: Ignoring Inverted Colors:

Some users with vision loss use inverted colors on their mobile phones to have greater screen contrast. Apple provided an API for iOS which allows developers to ignore certain views. This way, images and videos aren't distorted when a user has the inverted colors setting on. This API is currently unsupported by React Native.

Design of the New API

Solution One: Combining accessibilityComponentType (Android) and accessibilityTraits (iOS)

In order to solve the confusion between accessibilityComponentType and accessibilityTraits, we decided to merge them into a single property. This made sense because they technically had the same intended functionality and by merging them, developers no longer had to worry about platform specific intricacies when building accessibility features.

Background

On iOS, UIAccessibilityTraits is a property that can be set on any NSObject. Each of the 17 traits passed in through the javascript property to native is mapped to a UIAccessibilityTraits element in Objective-C. Traits are each represented by a long int, and every trait that is set is ORed together.

On Android however, AccessibilityComponentType is a concept that was made up by React Native, and doesn't directly map to any properties in Android. Accessibility is handled by an accessibility delegate. Each view has a default accessibility delegate. If you want to customize any accessibility actions, you have to create a new accessibility delegate, override specific methods you want to customize, and then set the accessibility delegate of the view you are handling to be associated with the new delegate. When a developer set AccessibilityComponentType, the native code created a new delegate based off of the component that was passed in, and set the view to have that accessibility delegate.

Changes Made

For our new property, we wanted to create a superset of the two properties. We decided to keep the new property modeled mostly after the existing property accessibilityTraits, since accessibilityTraits has significantly more values. The functionality of Android for these traits would be polyfilled in by modifying the Accessibility Delegate.

There are 17 values of UIAccessibilityTraits that accessibilityTraits on iOS can be set to. However, we didn't include all of them as possible values to our new property. This is because the effect of setting some of these traits is actually not very well known, and many of these values are virtually never used.

The values UIAccessibilityTraits were set to generally took on one of two purposes. They either described a role that UI element had, or they described the state a UI element was in. Most uses of the previous properties we observed usually used one value that represented a role and combined it with either “state selected,” “state disabled,” or both. Therefore, we decided to create two new accessibility properties: accessibilityRole and accessibilityState.

accessibilityRole

The new property, accessibilityRole, is used to tell Talkback or Voiceover the role of a UI Element. This new property can take on one of the following values:

  • none
  • button
  • link
  • search
  • image
  • keyboardkey
  • text
  • adjustable
  • header
  • summary
  • imagebutton

This property only allows one value to be passed in because UI elements generally don't logically take on more than one of these. The exception is image and button, so we've added a role imagebutton that is a combination of both.

accessibilityStates

The new property, accessibilityStates, is used to tell Talkback or Voiceover the state a UI Element is in. This property takes on an Array containing one or both of the following values:

  • selected
  • disabled

Solution Two: Adding Accessibility Hints

For this, we added a new property, accessibilityHint. Setting this property will allow Talkback or Voiceover to recite the hint to users.

accessibilityHint

This property takes in the accessibility hint to be read in the form of a String.

On iOS, setting this property will set the corresponding native property AccessibilityHint on the view. The hint will then be read by Voiceover if Accessibility Hints are turned on in the iPhone.

On Android, setting this property appends the value of the hint to the end of the accessibility label. The upside to this implementation is that it mimics the behavior of hints on iOS, but the downside to this implementation is that these hints cannot be turned off in the settings on Android the way they can be on iOS.

The reason we made this decision on Android is because normally, accessibility hints correspond with a specific action (e.g. click), and we wanted to keep behaviors consistent across platforms.

Solution to Problem Three

accessibilityIgnoresInvertColors

We exposed Apple's api AccessibilityIgnoresInvertColors to JavaScript, so now when you have a view where you don't want colors to be inverted (e.g image), you can set this property to true, and it won't be inverted.

New Usage

These new properties will become available in the React Native 0.57 release.

How to Upgrade

If you are currently using accessibilityComponentType and accessibilityTraits, here are the steps you can take to upgrade to the new properties.

1. Using jscodeshift

The most simple use cases can be replaced by running a jscodeshift script.

This script replaces the following instances:

accessibilityTraits=“trait”
accessibilityTraits={[“trait”]}

With

accessibilityRole= “trait”

This script also removes instances of AccessibilityComponentType (assuming everywhere you set AccessibilityComponentType, you would also set AccessibilityTraits).

2. Using a manual codemod

For the cases that used AccessibilityTraits that don't have a corresponding value for AccessibilityRole, and the cases where multiple traits were passed into AccessibilityTraits, a manual codemod would have to be done.

In general,

accessibilityTraits= {[“button”, “selected”]}

would be manually replaced with

accessibilityRole=“button”
accessibilityStates={[“selected”]}

These properties are already being used in Facebook's codebase. The codemod for Facebook was surprisingly simple. The jscodeshift script fixed about half of our instances, and the other half was fixed manually. Overall, the entire process took less than a few hours.

Hopefully you will find the updated API useful! And please continue making apps accessible! #inclusion

· 5 min read
Lorenzo Sciandra

The long-awaited 0.56 version of React Native is now available 🎉. This blog post highlights some of the changes introduced in this new release. We also want to take the opportunity to explain what has kept us busy since March.

The breaking changes dilemma, or, "when to release?"

The Contributor's Guide explains the integration process that all changes to React Native go through. The project has is composed by many different tools, requiring coordination and constant support to keep everything working properly. Add to this the vibrant open source community that contributes back to the project, and you will get a sense of the mind-bending scale of it all.

With React Native's impressive adoption, breaking changes must be made with great care, and the process is not as smooth as we'd like. A decision was made to skip the April and May releases to allow the core team to integrate and test a new set of breaking changes. Dedicated community communication channels were used along the way to ensure that the June 2018 (0.56.0) release is as hassle-free as possible to adopt by those who patiently waited for the stable release.

Is 0.56.0 perfect? No, as every piece of software out there: but we reached a point where the tradeoff between "waiting for more stability" versus "testing led to successful results so we can push forward" that we feel ready to release it. Moreover, we are aware of a few issues that are not solved in the final 0.56.0 release. Most developers should have no issues upgrading to 0.56.0. For those that are blocked by the aforementioned issues, we hope to see you around in our discussions and we are looking forward to working with you on a solution to these issues.

You might consider 0.56.0 as a fundamental building block towards a more stable framework: it will take probably a week or two of widespread adoption before all the edge cases will be sanded off, but this will lead to an even better July 2018 (0.57.0) release.

We'd like to conclude this section by thanking all the 67 contributors who worked on a total of 818 commits (!) that will help make your apps even better 👏.

And now, without further ado...

The Big Changes

Babel 7

As you may know, the transpiler tool that allows us all to use the latest and greatest features of JavaScript, Babel, is moving to v7 soon. Since this new version brings along some important changes, we felt that now it would be a good time to upgrade, allowing Metro to leverage on its improvements.

If you find yourself in trouble with upgrading, please refer to the documentation section related to it.

Modernizing Android support

On Android, much of the surrounding tooling has changed. We've updated to Gradle 3.5, Android SDK 26, Fresco to 1.9.0, and OkHttp to 3.10.0 and even the NDK API target to API 16. These changes should go without issue and result in faster builds. More importantly, it will help developers comply with the new Play Store requirements coming into effect next month.

Related to this, we'd like to particularly thank Dulmandakh for the many PRs submitted in order to make it possible 👏.

There are some more steps that need to be taken in this direction, and you can follow along with the future planning and discussion of updating the Android support in the dedicated issue (and a side one for the JSC).

New Node, Xcode, React, and Flow – oh my!

Node 8 is now the standard for React Native. It was actually already being tested already, but we've put both feet forward as Node 6 entered maintenance mode. React was also updated to 16.4, which brings a ton of fixes with it.

We're dropping support for iOS 8, making iOS 9 the oldest iOS version that can be targeted. We do not foresee this being a problem, as any device that can run iOS 8, can be upgraded to iOS 9. This change allowed us to remove rarely-used code that implemented workarounds for older devices running iOS 8.

The continuous integration toolchain has been updated to use Xcode 9.4, ensuring that all iOS tests are run on the latest developer tools provided by Apple.

We have upgraded to Flow 0.75 to use the new error format that many devs appreciate. We've also created types for many more components. If you're not yet enforcing static typing in your project, please consider using Flow to identify problems as you code instead of at runtime.

And a lot of other things...

For instance, YellowBox was replaced with a new implementation that makes debugging a lot better.

For the complete release notes, please reference the full changelog here. And remember to keep an eye on the upgrading guide to avoid issues moving to this new version.


A final note: starting this week, the React Native core team will resume holding monthly meetings. We'll make sure to keep everyone up-to-date with what's covered, and ensure to keep your feedback at hand for future meetings.

Happy coding everyone!

Lorenzo, Ryan, and the whole React Native core team

PS: as always, we'd like to remind everyone that React Native is still in 0.x versioning because of the many changes still undergoing - so remember when upgrading that yes, probably, something may still crash or be broken. Be helpful towards each other in the issues and when submitting PRs - and remember to follow the CoC enforced: there's always a human on the other side of the screen.

· 5 min read
Sophie Alpert

It's been a while since we last published a status update about React Native.

At Facebook, we're using React Native more than ever and for many important projects. One of our most popular products is Marketplace, one of the top-level tabs in our app which is used by 800 million people each month. Since its creation in 2015, all of Marketplace has been built with React Native, including over a hundred full-screen views throughout different parts of the app.

We're also using React Native for many new parts of the app. If you watched the F8 keynote last month, you'll recognize Blood Donations, Crisis Response, Privacy Shortcuts, and Wellness Checks – all recent features built with React Native. And projects outside the main Facebook app are using React Native too. The new Oculus Go VR headset includes a companion mobile app that is fully built with React Native, not to mention React VR powering many experiences in the headset itself.

Naturally, we also use many other technologies to build our apps. Litho and ComponentKit are two libraries we use extensively in our apps; both provide a React-like component API for building native screens. It's never been a goal for React Native to replace all other technologies – we are focused on making React Native itself better, but we love seeing other teams borrow ideas from React Native, like bringing instant reload to non-JavaScript code too.

Architecture

When we started the React Native project in 2013, we designed it to have a single “bridge” between JavaScript and native that is asynchronous, serializable, and batched. Just as React DOM turns React state updates into imperative, mutative calls to DOM APIs like document.createElement(attrs) and .appendChild(), React Native was designed to return a single JSON message that lists mutations to perform, like [["createView", attrs], ["manageChildren", ...]]. We designed the entire system to never rely on getting a synchronous response back and to ensure everything in that list could be fully serialized to JSON and back. We did this for the flexibility it gave us: on top of this architecture, we were able to build tools like Chrome debugging, which runs all the JavaScript code asynchronously over a WebSocket connection.

Over the last 5 years, we found that these initial principles have made building some features harder. An asynchronous bridge means you can't integrate JavaScript logic directly with many native APIs expecting synchronous answers. A batched bridge that queues native calls means it's harder to have React Native apps call into functions that are implemented natively. And a serializable bridge means unnecessary copying instead of directly sharing memory between the two worlds. For apps that are entirely built in React Native, these restrictions are usually bearable. But for apps with complex integration between React Native and existing app code, they are frustrating.

We're working on a large-scale rearchitecture of React Native to make the framework more flexible and integrate better with native infrastructure in hybrid JavaScript/native apps. With this project, we'll apply what we've learned over the last 5 years and incrementally bring our architecture to a more modern one. We're rewriting many of React Native's internals, but most of the changes are under the hood: existing React Native apps will continue to work with few or no changes.

To make React Native more lightweight and fit better into existing native apps, this rearchitecture has three major internal changes. First, we are changing the threading model. Instead of each UI update needing to perform work on three different threads, it will be possible to call synchronously into JavaScript on any thread for high-priority updates while still keeping low-priority work off the main thread to maintain responsiveness. Second, we are incorporating async rendering capabilities into React Native to allow multiple rendering priorities and to simplify asynchronous data handling. Finally, we are simplifying our bridge to make it faster and more lightweight; direct calls between native and JavaScript are more efficient and will make it easier to build debugging tools like cross-language stack traces.

Once these changes are completed, closer integrations will be possible. Today, it's not possible to incorporate native navigation and gesture handling or native components like UICollectionView and RecyclerView without complex hacks. After our changes to the threading model, building features like this will be straightforward.

We'll release more details about this work later this year as it approaches completion.

Community

Alongside the community inside Facebook, we're happy to have a thriving population of React Native users and collaborators outside Facebook. We'd like to support the React Native community more, both by serving React Native users better and by making the project easier to contribute to.

Just as our architecture changes will help React Native interoperate more cleanly with other native infrastructure, React Native should be slimmer on the JavaScript side to fit better with the JavaScript ecosystem, which includes making the VM and bundler swappable. We know the pace of breaking changes can be hard to keep up with, so we'd like to find ways to have fewer major releases. Finally, we know that some teams are looking for more thorough documentation in topics like startup optimization, where our expertise hasn't yet been written down. Expect to see some of these changes over the coming year.

If you're using React Native, you're part of our community; keep letting us know how we can make React Native better for you.

React Native is just one tool in a mobile developer's toolbox, but it's one that we strongly believe in – and we're making it better every day, with over 2500 commits in the last year from 500+ contributors.

· 8 min read
Ash Furrow

JavaScript! We all love it. But some of us also love types. Luckily, options exist to add stronger types to JavaScript. My favourite is TypeScript, but React Native supports Flow out of the box. Which you prefer is a matter of preference, they each have their own approach on how to add the magic of types to JavaScript. Today, we're going to look at how to use TypeScript in React Native apps.

This post uses Microsoft's TypeScript-React-Native-Starter repo as a guide.

Update: Since this blog post was written, things have gotten even easier. You can replace all the set up described in this blog post by running just one command:

npx react-native init MyAwesomeProject --template react-native-template-typescript

However, there are some limitations to Babel's TypeScript support, which the blog post above goes into in detail. The steps outlined in this post still work, and Artsy is still using react-native-typescript-transformer in production, but the fastest way to get up and running with React Native and TypeScript is using the above command. You can always switch later if you have to.

In any case, have fun! The original blog post continues below.

Prerequisites

Because you might be developing on one of several different platforms, targeting several different types of devices, basic setup can be involved. You should first ensure that you can run a plain React Native app without TypeScript. Follow the instructions on the React Native website to get started. When you've managed to deploy to a device or emulator, you'll be ready to start a TypeScript React Native app.

You will also need Node.js, npm, and Yarn.

Initializing

Once you've tried scaffolding out an ordinary React Native project, you'll be ready to start adding TypeScript. Let's go ahead and do that.

react-native init MyAwesomeProject
cd MyAwesomeProject

Adding TypeScript

The next step is to add TypeScript to your project. The following commands will:

  • add TypeScript to your project
  • add React Native TypeScript Transformer to your project
  • initialize an empty TypeScript config file, which we'll configure next
  • add an empty React Native TypeScript Transformer config file, which we'll configure next
  • adds typings for React and React Native

Okay, let's go ahead and run these.

yarn add --dev typescript
yarn add --dev react-native-typescript-transformer
yarn tsc --init --pretty --jsx react
touch rn-cli.config.js
yarn add --dev @types/react @types/react-native

The tsconfig.json file contains all the settings for the TypeScript compiler. The defaults created by the command above are mostly fine, but open the file and uncomment the following line:

{
/* Search the config file for the following line and uncomment it. */
// "allowSyntheticDefaultImports": true, /* Allow default imports from modules with no default export. This does not affect code emit, just typechecking. */
}

The rn-cli.config.js contains the settings for the React Native TypeScript Transformer. Open it and add the following:

module.exports = {
getTransformModulePath() {
return require.resolve('react-native-typescript-transformer');
},
getSourceExts() {
return ['ts', 'tsx'];
},
};

Migrating to TypeScript

Rename the generated App.js and __tests_/App.js files to App.tsx. index.js needs to use the .js extension. All new files should use the .tsx extension (or .ts if the file doesn't contain any JSX).

If you tried to run the app now, you'd get an error like object prototype may only be an object or null. This is caused by a failure to import the default export from React as well as a named export on the same line. Open App.tsx and modify the import at the top of the file:

-import React, { Component } from 'react';
+import React from 'react'
+import { Component } from 'react';

Some of this has to do with differences in how Babel and TypeScript interoperate with CommonJS modules. In the future, the two will stabilize on the same behaviour.

At this point, you should be able to run the React Native app.

Adding TypeScript Testing Infrastructure

React Native ships with Jest, so for testing a React Native app with TypeScript, we'll want to add ts-jest to our devDependencies.

yarn add --dev ts-jest

Then, we'll open up our package.json and replace the jest field with the following:

{
"jest": {
"preset": "react-native",
"moduleFileExtensions": [
"ts",
"tsx",
"js"
],
"transform": {
"^.+\\.(js)$": "<rootDir>/node_modules/babel-jest",
"\\.(ts|tsx)$": "<rootDir>/node_modules/ts-jest/preprocessor.js"
},
"testRegex": "(/__tests__/.*|\\.(test|spec))\\.(ts|tsx|js)$",
"testPathIgnorePatterns": [
"\\.snap$",
"<rootDir>/node_modules/"
],
"cacheDirectory": ".jest/cache"
}
}

This will configure Jest to run .ts and .tsx files with ts-jest.

Installing Dependency Type Declarations

To get the best experience in TypeScript, we want the type-checker to understand the shape and API of our dependencies. Some libraries will publish their packages with .d.ts files (type declaration/type definition files), which can describe the shape of the underlying JavaScript. For other libraries, we'll need to explicitly install the appropriate package in the @types/ npm scope.

For example, here we'll need types for Jest, React, and React Native, and React Test Renderer.

yarn add --dev @types/jest @types/react @types/react-native @types/react-test-renderer

We saved these declaration file packages to our dev dependencies because this is a React Native app that only uses these dependencies during development and not during runtime. If we were publishing a library to NPM, we might have to add some of these type dependencies as regular dependencies.

You can read more here about getting .d.ts files.

Ignoring More Files

For your source control, you'll want to start ignoring the .jest folder. If you're using git, we can just add entries to our .gitignore file.

# Jest
#
.jest/

As a checkpoint, consider committing your files into version control.

git init
git add .gitignore # import to do this first, to ignore our files
git add .
git commit -am "Initial commit."

Adding a Component

Let's add a component to our app. Let's go ahead and create a Hello.tsx component. It's a pedagogical component, not something that you'd actually write in an app, but something nontrivial that shows off how to use TypeScript in React Native.

Create a components directory and add the following example.

// components/Hello.tsx
import React from 'react';
import {Button, StyleSheet, Text, View} from 'react-native';

export interface Props {
name: string;
enthusiasmLevel?: number;
}

interface State {
enthusiasmLevel: number;
}

export class Hello extends React.Component<Props, State> {
constructor(props: Props) {
super(props);

if ((props.enthusiasmLevel || 0) <= 0) {
throw new Error(
'You could be a little more enthusiastic. :D',
);
}

this.state = {
enthusiasmLevel: props.enthusiasmLevel || 1,
};
}

onIncrement = () =>
this.setState({
enthusiasmLevel: this.state.enthusiasmLevel + 1,
});
onDecrement = () =>
this.setState({
enthusiasmLevel: this.state.enthusiasmLevel - 1,
});
getExclamationMarks = (numChars: number) =>
Array(numChars + 1).join('!');

render() {
return (
<View style={styles.root}>
<Text style={styles.greeting}>
Hello{' '}
{this.props.name +
this.getExclamationMarks(this.state.enthusiasmLevel)}
</Text>

<View style={styles.buttons}>
<View style={styles.button}>
<Button
title="-"
onPress={this.onDecrement}
accessibilityLabel="decrement"
color="red"
/>
</View>

<View style={styles.button}>
<Button
title="+"
onPress={this.onIncrement}
accessibilityLabel="increment"
color="blue"
/>
</View>
</View>
</View>
);
}
}

// styles
const styles = StyleSheet.create({
root: {
alignItems: 'center',
alignSelf: 'center',
},
buttons: {
flexDirection: 'row',
minHeight: 70,
alignItems: 'stretch',
alignSelf: 'center',
borderWidth: 5,
},
button: {
flex: 1,
paddingVertical: 0,
},
greeting: {
color: '#999',
fontWeight: 'bold',
},
});

Whoa! That's a lot, but let's break it down:

  • Instead of rendering HTML elements like div, span, h1, etc., we're rendering components like View and Button. These are native components that work across different platforms.
  • Styling is specified using the StyleSheet.create function that React Native gives us. React's stylesheets allow us to control our layout using Flexbox, and style using other constructs similar to those in CSS.

Adding a Component Test

Now that we've got a component, let's try testing it.

We already have Jest installed as a test runner. We're going to write snapshot tests for our components, let's add the required add-on for snapshot tests:

yarn add --dev react-addons-test-utils

Now let's create a __tests__ folder in the components directory and add a test for Hello.tsx:

// components/__tests__/Hello.tsx
import React from 'react';
import renderer from 'react-test-renderer';

import {Hello} from '../Hello';

it('renders correctly with defaults', () => {
const button = renderer
.create(<Hello name="World" enthusiasmLevel={1} />)
.toJSON();
expect(button).toMatchSnapshot();
});

The first time the test is run, it will create a snapshot of the rendered component and store it in the components/__tests__/__snapshots__/Hello.tsx.snap file. When you modify your component, you'll need to update the snapshots and review the update for inadvertent changes. You can read more about testing React Native components here.

Next Steps

Check out the official React tutorial and state-management library Redux. These resources can be helpful when writing React Native apps. Additionally, you may want to look at ReactXP, a component library written entirely in TypeScript that supports both React on the web as well as React Native.

Have fun in a more type-safe React Native development environment!

· 5 min read
Garrett McCullough

Build.com, headquartered in Chico, California, is one of the largest online retailers for home improvement items. The team has had a strong web-centric business for 18 years and began thinking about a mobile App in 2015. Building unique Android and iOS apps wasn’t practical due to our small team and limited native experience. Instead, we decided to take a risk on the very new React Native framework. Our initial commit was on August 12, 2015 using React Native v0.8.0! We were live in both App Stores on October 15, 2016. Over the last two years, we’ve continued to upgrade and expand the app. We are currently on React Native version 0.53.0.

You can check out the app at https://www.build.com/app.

Features

Our app is full featured and includes everything that you’d expect from an e-commerce app: product listings, search and sorting, the ability to configure complex products, favorites, etc. We accept standard credit card payment methods as well as PayPal, and Apple Pay for our iOS users.

A few standout features you might not expect include:

  1. 3D models available for around 40 products with 90 finishes
  2. Augmented Reality (AR) to allow the user to see how lights and faucets will look in their home at 98% size accuracy. The Build.com React Native App is featured in the Apple App Store for AR Shopping! AR is now available for Android and iOS!
  3. Collaborative project management features that allow people to put together shopping lists for the different phases of their project and collaborate around selection

We’re working on many new and exciting features that will continue to improve our app experience including the next phase of Immersive Shopping with AR.

Our Development Workflow

Build.com allows each dev to choose the tools that best suit them.

  • IDEs include Atom, IntelliJ, VS Code, Sublime, Eclipse, etc.
  • For Unit testing, developers are responsible for creating Jest unit tests for any new components and we’re working to increase the coverage of older parts of the app using jest-coverage-ratchet.
  • We use Jenkins to build out our beta and release candidates. This process works well for us but still requires significant work to create the release notes and other artifacts.
  • Integration Testing include a shared pool of testers that work across desktop, mobile and web. Our automation engineer is building out our suite of automated integration tests using Java and Appium.
  • Other parts of the workflow include a detailed eslint configuration, custom rules that enforce properties needed for testing, and pre-push hooks that block offending changes.

Libraries Used in the App

The Build.com app relies on a number of common open source libraries including: Redux, Moment, Numeral, Enzyme and a bunch of React Native bridge modules. We also use a number of forked open source libraries; forked either because they were abandoned or because we needed custom features. A quick count shows around 115 JavaScript and native dependencies. We would like to explore tools that remove unused libraries.

We're in the process of adding static typing via TypeScript and looking into optional chaining. These features could help us with solving a couple classes of bugs that we still see:

  • Data that is the wrong type
  • Data that is undefined because an object didn’t contain what we expected

Open Source Contributions

Since we rely so heavily on open source, our team is committed to contributing back to the community. Build.com allows the team to open source libraries that we've built and encourages us contribute back to the libraries that we use.

We’ve released and maintained a number of React Native libraries:

  • react-native-polyfill
  • react-native-simple-store
  • react-native-contact-picker

We have also contributed to a long list of libraries including: React and React Native, react-native-schemes-manager, react-native-swipeable, react-native-gallery, react-native-view-transformer, react-native-navigation.

Our Journey

We’ve seen a lot of growth in React Native and the ecosystem in the past couple years. Early on, it seemed that every version of React Native would fix some bugs but introduce several more. For example, Remote JS Debugging was broken on Android for several months. Thankfully, things became much more stable in 2017.

One of our big recurring challenges has been with navigation libraries. For a long time, we were using Expo’s ex-nav library. It worked well for us but it was eventually deprecated. However, we were in heavy feature development at the time so taking time to change out a navigation library wasn’t feasible. That meant we had to fork the library and patch it to support React 16 and the iPhone X. Eventually, we were able to migrate to react-native-navigation and hopefully that will see continued support.

Bridge Modules

Another big challenge has been with bridge modules. When we first started, a lot of critical bridges were missing. One of my teammates wrote react-native-contact-picker because we needed access to the Android contact picker in our app. We’ve also seen a lot of bridges that were broken by changes within React Native. For example, there was a breaking change within React Native v40 and when we upgraded our app, I had to submit PRs to fix 3 or 4 libraries that had not yet been updated.

Looking Forward

As React Native continues to grow, our wishlist to our community include:

  • Stabilize and improve the navigation libraries
  • Maintain support for libraries in the React Native ecosystem
  • Improve the experience for adding native libraries and bridge modules to a project

Companies and individuals in the React Native community have been great about volunteering their time and effort to improve the tools that we all use. If you haven’t gotten involved in open source, I hope you’ll take a look at improving the code or documentation for some of the libraries that you use. There are a lot of articles to help you get started and it may be a lot easier than you think!

· 6 min read
Peter Argany

Motivation

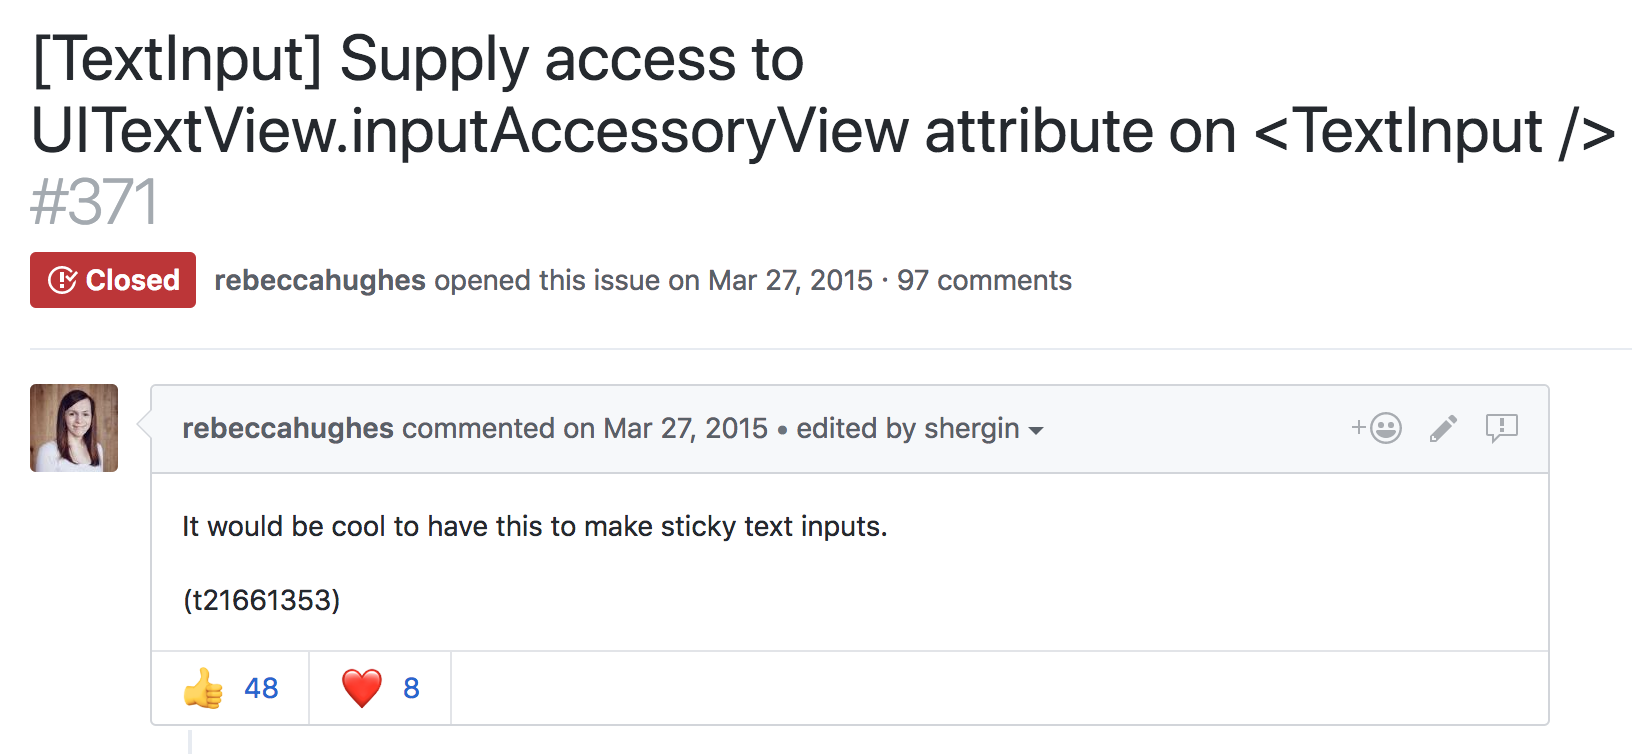
Three years ago, a GitHub issue was opened to support input accessory view from React Native.

In the ensuing years, there have been countless '+1s', various workarounds, and zero concrete changes to RN on this issue - until today. Starting with iOS, we're exposing an API for accessing the native input accessory view and we are excited to share how we built it.

Background

What exactly is an input accessory view? Reading Apple's developer documentation, we learn that it's a custom view which can be anchored to the top of the system keyboard whenever a receiver becomes the first responder. Anything that inherits from UIResponder can redeclare the .inputAccessoryView property as read-write, and manage a custom view here. The responder infrastructure mounts the view, and keeps it in sync with the system keyboard. Gestures which dismiss the keyboard, like a drag or tap, are applied to the input accessory view at the framework level. This allows us to build content with interactive keyboard dismissal, an integral feature in top-tier messaging apps like iMessage and WhatsApp.

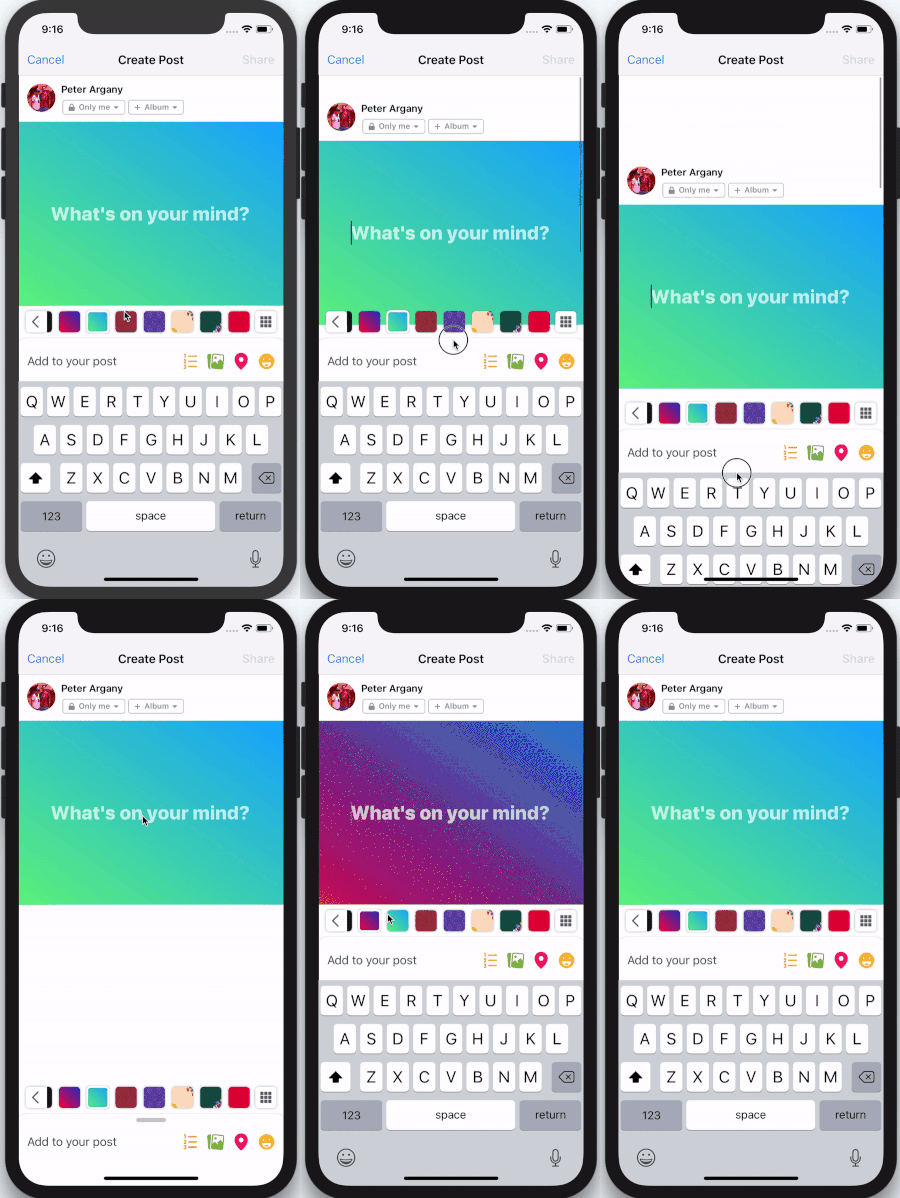
There are two common use cases for anchoring a view to the top of the keyboard. The first is creating a keyboard toolbar, like the Facebook composer background picker.

In this scenario, the keyboard is focused on a text input field, and the input accessory view is used to provide additional keyboard functionality. This functionality is contextual to the type of input field. In a mapping application it could be address suggestions, or in a text editor, it could be rich text formatting tools.


The Objective-C UIResponder who owns the <InputAccessoryView> in this scenario should be clear. The <TextInput> has become first responder, and under the hood this becomes an instance of UITextView or UITextField.

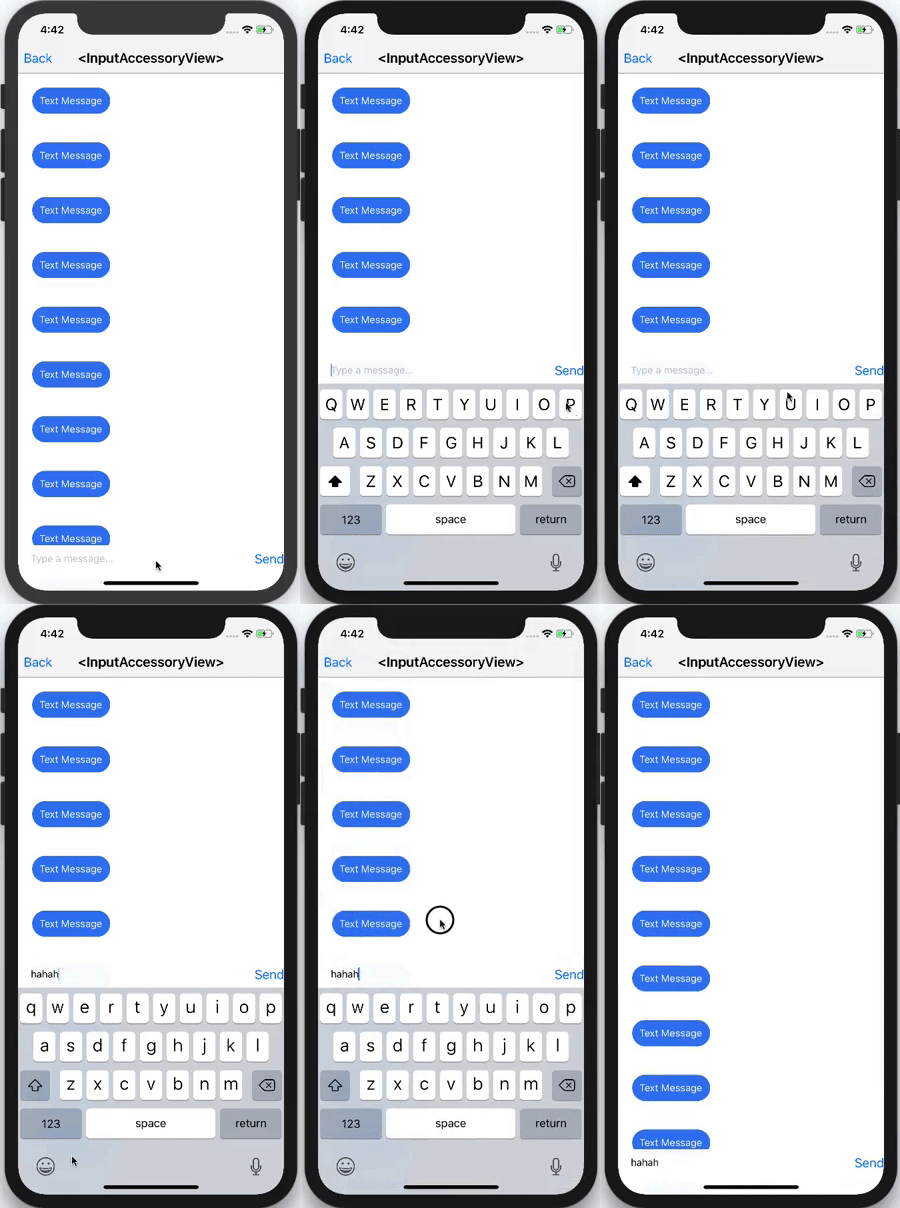
The second common scenario is sticky text inputs:

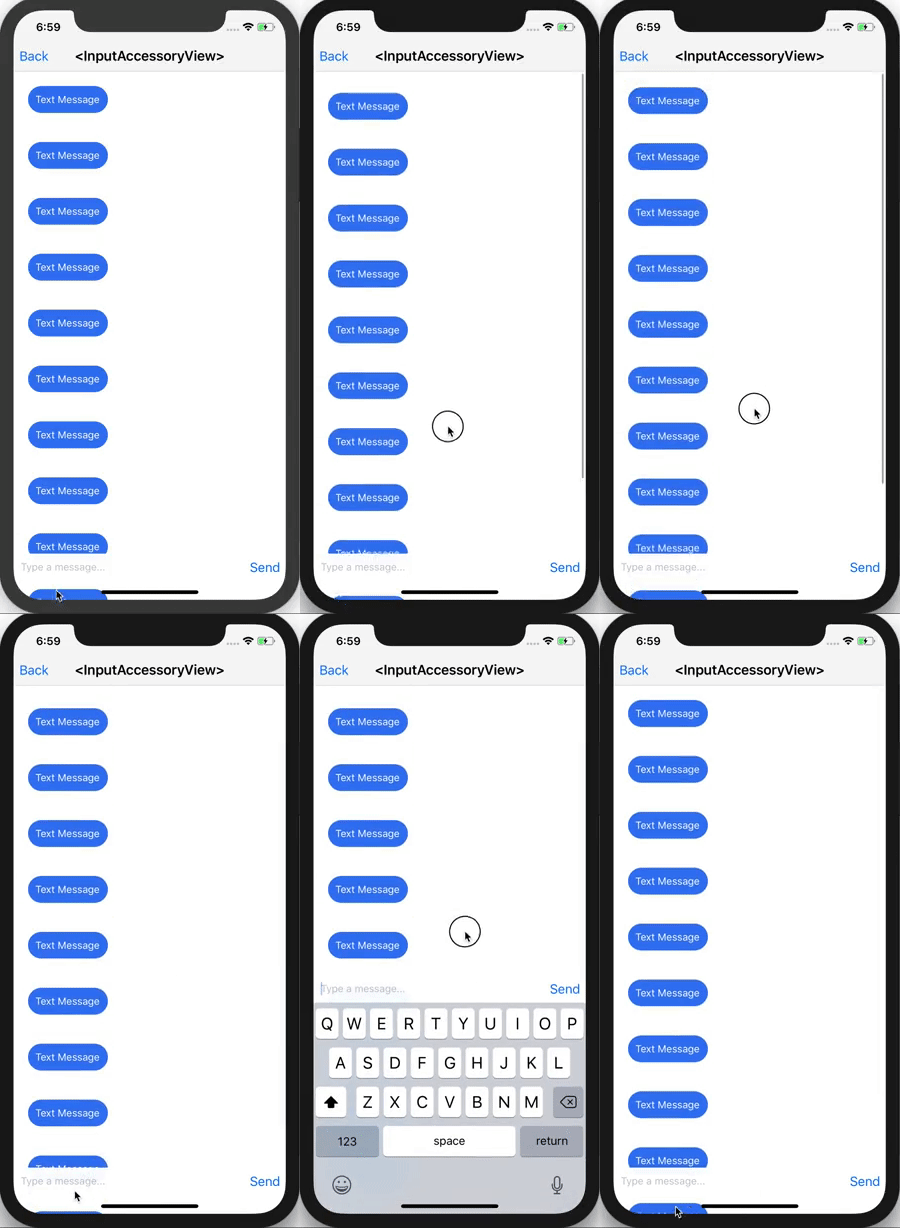
Here, the text input is actually part of the input accessory view itself. This is commonly used in messaging applications, where a message can be composed while scrolling through a thread of previous messages.


Who owns the <InputAccessoryView> in this example? Can it be the UITextView or UITextField again? The text input is inside the input accessory view, this sounds like a circular dependency. Solving this issue alone is another blog post in itself. Spoilers: the owner is a generic UIView subclass who we manually tell to becomeFirstResponder.

API Design

We now know what an <InputAccessoryView> is, and how we want to use it. The next step is designing an API that makes sense for both use cases, and works well with existing React Native components like <TextInput>.

For keyboard toolbars, there are a few things we want to consider:

  1. We want to be able to hoist any generic React Native view hierarchy into the <InputAccessoryView>.
  2. We want this generic and detached view hierarchy to accept touches and be able to manipulate application state.
  3. We want to link an <InputAccessoryView> to a particular <TextInput>.
  4. We want to be able to share an <InputAccessoryView> across multiple text inputs, without duplicating any code.

We can achieve #1 using a concept similar to React portals. In this design, we portal React Native views to a UIView hierarchy managed by the responder infrastructure. Since React Native views render as UIViews, this is actually quite straightforward - we can just override:

- (void)insertReactSubview:(UIView *)subview atIndex:(NSInteger)atIndex

and pipe all the subviews to a new UIView hierarchy. For #2, we set up a new RCTTouchHandler for the <InputAccessoryView>. State updates are achieved by using regular event callbacks. For #3 and #4, we use the nativeID field to locate the accessory view UIView hierarchy in native code during the creation of a <TextInput> component. This function uses the .inputAccessoryView property of the underlying native text input. Doing this effectively links <InputAccessoryView> to <TextInput> in their ObjC implementations.

Supporting sticky text inputs (scenario 2) adds a few more constraints. For this design, the input accessory view has a text input as a child, so linking via nativeID is not an option. Instead, we set the .inputAccessoryView of a generic off-screen UIView to our native <InputAccessoryView> hierarchy. By manually telling this generic UIView to become first responder, the hierarchy is mounted by responder infrastructure. This concept is explained thoroughly in the aforementioned blog post.

Pitfalls

Of course not everything was smooth sailing while building this API. Here are a few pitfalls we encountered, along with how we fixed them.

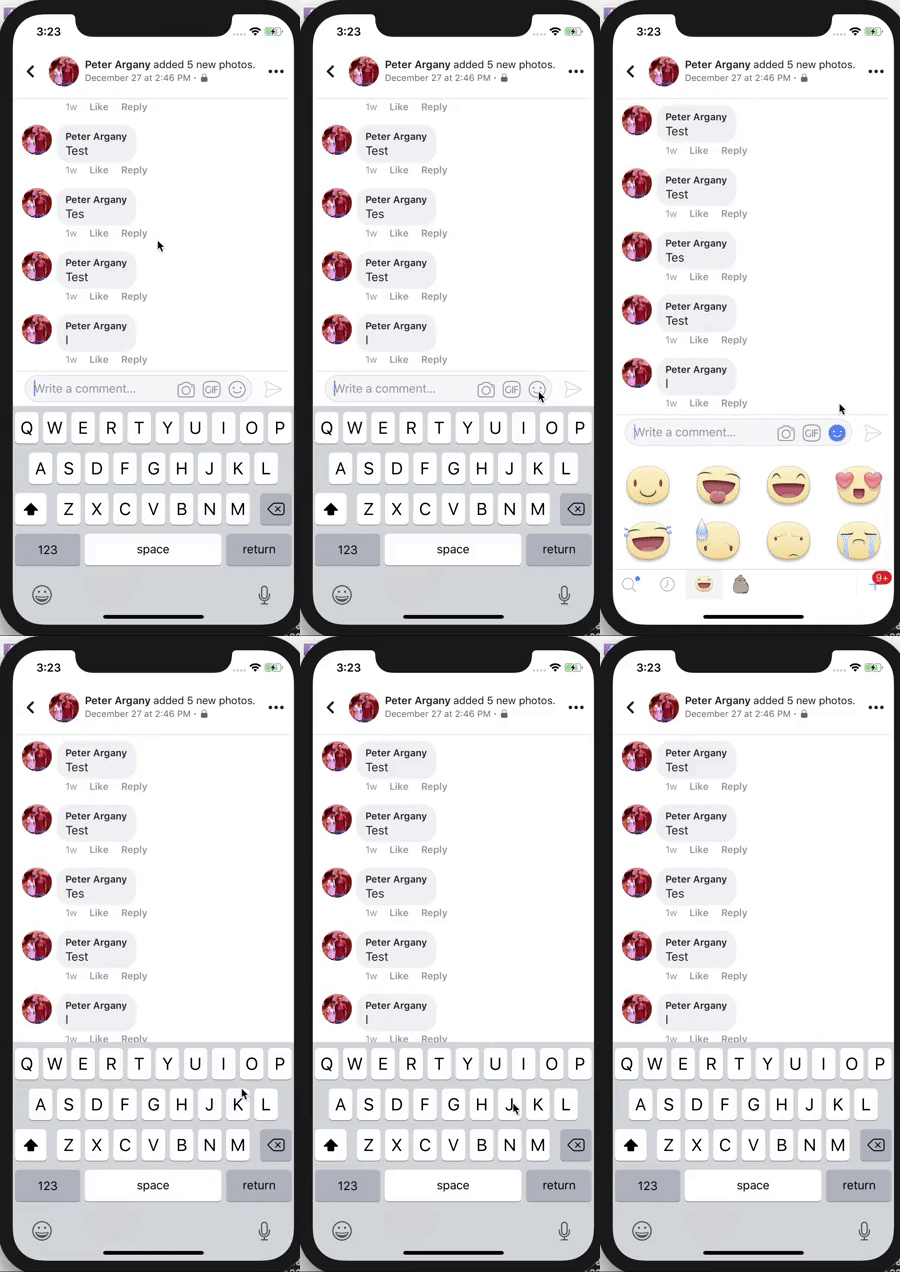
An initial idea for building this API involved listening to NSNotificationCenter for UIKeyboardWill(Show/Hide/ChangeFrame) events. This pattern is used in some open-sourced libraries, and internally in some parts of the Facebook app. Unfortunately, UIKeyboardDidChangeFrame events were not being called in time to update the <InputAccessoryView> frame on swipes. Also, changes in keyboard height are not captured by these events. This creates a class of bugs that manifest like this:

On iPhone X, text and emoji keyboard are different heights. Most applications using keyboard events to manipulate text input frames had to fix the above bug. Our solution was to commit to using the .inputAccessoryView property, which meant that the responder infrastructure handles frame updates like this.


Another tricky bug we encountered was avoiding the home pill on iPhone X. You may be thinking, “Apple developed safeAreaLayoutGuide for this very reason, this is trivial!”. We were just as naive. The first issue is that the native <InputAccessoryView> implementation has no window to anchor to until the moment it is about to appear. That's alright, we can override -(BOOL)becomeFirstResponder and enforce layout constraints there. Adhering to these constraints bumps the accessory view up, but another bug arises:

The input accessory view successfully avoids the home pill, but now content behind the unsafe area is visible. The solution lies in this radar. I wrapped the native <InputAccessoryView> hierarchy in a container which doesn't conform to the safeAreaLayoutGuide constraints. The native container covers the content in the unsafe area, while the <InputAccessoryView> stays within the safe area boundaries.


Example Usage

Here's an example which builds a keyboard toolbar button to reset <TextInput> state.

class TextInputAccessoryViewExample extends React.Component<
{},
*,
> {
constructor(props) {
super(props);
this.state = {text: 'Placeholder Text'};
}

render() {
const inputAccessoryViewID = 'inputAccessoryView1';
return (
<View>
<TextInput
style={styles.default}
inputAccessoryViewID={inputAccessoryViewID}
onChangeText={text => this.setState({text})}
value={this.state.text}
/>
<InputAccessoryView nativeID={inputAccessoryViewID}>
<View style={{backgroundColor: 'white'}}>
<Button
onPress={() =>
this.setState({text: 'Placeholder Text'})
}
title="Reset Text"
/>
</View>
</InputAccessoryView>
</View>
);
}
}

Another example for Sticky Text Inputs can be found in the repository.

When will I be able to use this?

The full commit for this feature implementation is here. <InputAccessoryView> will be available in the upcoming v0.55.0 release.

Happy keyboarding :)

· 9 min read
Richard Threlkeld

AWS is well known in the technology industry as a provider of cloud services. These include compute, storage, and database technologies, as well as fully managed serverless offerings. The AWS Mobile team has been working closely with customers and members of the JavaScript ecosystem to make cloud-connected mobile and web applications more secure, scalable, and easier to develop and deploy. We began with a complete starter kit, but have a few more recent developments.

This blog post talks about some interesting things for React and React Native developers:

  • AWS Amplify, a declarative library for JavaScript applications using cloud services
  • AWS AppSync, a fully managed GraphQL service with offline and real-time features

AWS Amplify

React Native applications are very easy to bootstrap using tools like Create React Native App and Expo. However, connecting them to the cloud can be challenging to navigate when you try to match a use case to infrastructure services. For example, your React Native app might need to upload photos. Should these be protected per user? That probably means you need some sort of registration or sign-in process. Do you want your own user directory or are you using a social media provider? Maybe your app also needs to call an API with custom business logic after users log in.

To help JavaScript developers with these problems, we released a library named AWS Amplify. The design is broken into "categories" of tasks, instead of AWS-specific implementations. For example, if you wanted users to register, log in, and then upload private photos, you would simply pull in Auth and Storage categories to your application:

import { Auth } from 'aws-amplify';

Auth.signIn(username, password)
.then(user => console.log(user))
.catch(err => console.log(err));

Auth.confirmSignIn(user, code)
.then(data => console.log(data))
.catch(err => console.log(err));

In the code above, you can see an example of some of the common tasks that Amplify helps you with, such as using multi-factor authentication (MFA) codes with either email or SMS. The supported categories today are:

  • Auth: Provides credential automation. Out-of-the-box implementation uses AWS credentials for signing, and OIDC JWT tokens from Amazon Cognito. Common functionality, such as MFA features, is supported.
  • Analytics: With a single line of code, get tracking for authenticated or unauthenticated users in Amazon Pinpoint. Extend this for custom metrics or attributes, as you prefer.
  • API: Provides interaction with RESTful APIs in a secure manner, leveraging AWS Signature Version 4. The API module is great on serverless infrastructures with Amazon API Gateway.
  • Storage: Simplified commands to upload, download, and list content in Amazon S3. You can also easily group data into public or private content on a per-user basis.
  • Caching: An LRU cache interface across web apps and React Native that uses implementation-specific persistence.
  • i18n and Logging: Provides internationalization and localization capabilities, as well as debugging and logging capabilities.

One of the nice things about Amplify is that it encodes "best practices" in the design for your specific programming environment. For example, one thing we found working with customers and React Native developers is that shortcuts taken during development to get things working quickly would make it through to production stacks. These can compromise either scalability or security, and force infrastructure rearchitecture and code refactoring.

One example of how we help developers avoid this is the Serverless Reference Architectures with AWS Lambda. These show you best practices around using Amazon API Gateway and AWS Lambda together when building your backend. This pattern is encoded into the API category of Amplify. You can use this pattern to interact with several different REST endpoints, and pass headers all the way through to your Lambda function for custom business logic. We’ve also released an AWS Mobile CLI for bootstrapping new or existing React Native projects with these features. To get started, just install via npm, and follow the configuration prompts:

npm install --global awsmobile-cli
awsmobile configure

Another example of encoded best practices that is specific to the mobile ecosystem is password security. The default Auth category implementation leverages Amazon Cognito user pools for user registration and sign-in. This service implements Secure Remote Password protocol as a way of protecting users during authentication attempts. If you're inclined to read through the mathematics of the protocol, you'll notice that you must use a large prime number when calculating the password verifier over a primitive root to generate a Group. In React Native environments, JIT is disabled. This makes BigInteger calculations for security operations such as this less performant. To account for this, we've released native bridges in Android and iOS that you can link inside your project:

npm install --save aws-amplify-react-native
react-native link amazon-cognito-identity-js

We're also excited to see that the Expo team has included this in their latest SDK so that you can use Amplify without ejecting.

Finally, specific to React Native (and React) development, Amplify contains higher order components (HOCs) for easily wrapping functionality, such as for sign-up and sign-in to your app:

import Amplify, { withAuthenticator } from 'aws-amplify-react-native';
import aws_exports from './aws-exports';

Amplify.configure(aws_exports);

class App extends React.Component {
...
}

export default withAuthenticator(App);

The underlying component is also provided as <Authenticator />, which gives you full control to customize the UI. It also gives you some properties around managing the state of the user, such as if they've signed in or are waiting for MFA confirmation, and callbacks that you can fire when state changes.

Similarly, you'll find general React components that you can use for different use cases. You can customize these to your needs, for example, to show all private images from Amazon S3 in the Storage module:

<S3Album
level="private"
path={path}
filter={(item) => /jpg/i.test(item.path)}/>

You can control many of the component features via props, as shown earlier, with public or private storage options. There are even capabilities to automatically gather analytics when users interact with certain UI components:

return <S3Album track/>

AWS Amplify favors a convention over configuration style of development, with a global initialization routine or initialization at the category level. The quickest way to get started is with an aws-exports file. However, developers can also use the library independently with existing resources.

For a deep dive into the philosophy and to see a full demo, check out the video from AWS re:Invent.

AWS AppSync

Shortly after the launch of AWS Amplify, we also released AWS AppSync. This is a fully managed GraphQL service that has both offline and real-time capabilities. Although you can use GraphQL in different client programming languages (including native Android and iOS), it's quite popular among React Native developers. This is because the data model fits nicely into a unidirectional data flow and component hierarchy.

AWS AppSync enables you to connect to resources in your own AWS account, meaning you own and control your data. This is done by using data sources, and the service supports Amazon DynamoDB, Amazon Elasticsearch, and AWS Lambda. This enables you to combine functionality (such as NoSQL and full-text search) in a single GraphQL API as a schema. This enables you to mix and match data sources. The AppSync service can also provision from a schema, so if you aren't familiar with AWS services, you can write GraphQL SDL, click a button, and you're automatically up and running.

The real-time functionality in AWS AppSync is controlled via GraphQL subscriptions with a well-known, event-based pattern. Because subscriptions in AWS AppSync are controlled on the schema with a GraphQL directive, and a schema can use any data source, this means you can trigger notifications from database operations with Amazon DynamoDB and Amazon Elasticsearch Service, or from other parts of your infrastructure with AWS Lambda.

In a way similar to AWS Amplify, you can use enterprise security features on your GraphQL API with AWS AppSync. The service lets you get started quickly with API keys. However, as you roll to production it can transition to using AWS Identity and Access Management (IAM) or OIDC tokens from Amazon Cognito user pools. You can control access at the resolver level with policies on types. You can even use logical checks for fine-grained access control checks at run time, such as detecting if a user is the owner of a specific database resource. There are also capabilities around checking group membership for executing resolvers or individual database record access.

To help React Native developers learn more about these technologies, there is a built-in GraphQL sample schema that you can launch on the AWS AppSync console homepage. This sample deploys a GraphQL schema, provisions database tables, and connects queries, mutations, and subscriptions automatically for you. There is also a functioning React Native example for AWS AppSync which leverages this built in schema (as well as a React example), which enable you to get both your client and cloud components running in minutes.

Getting started is simple when you use the AWSAppSyncClient, which plugs in to the Apollo Client. The AWSAppSyncClient handles security and signing for your GraphQL API, offline functionality, and the subscription handshake and negotiation process:

import AWSAppSyncClient from "aws-appsync";
import { Rehydrated } from 'aws-appsync-react';
import { AUTH_TYPE } from "aws-appsync/lib/link/auth-link";

const client = new AWSAppSyncClient({
url: awsconfig.graphqlEndpoint,
region: awsconfig.region,
auth: {type: AUTH_TYPE.API_KEY, apiKey: awsconfig.apiKey}
});

The AppSync console provides a configuration file for download, which contains your GraphQL endpoint, AWS Region, and API key. You can then use the client with React Apollo:

const WithProvider = () => (
<ApolloProvider client={client}>
<Rehydrated>
<App />
</Rehydrated>
</ApolloProvider>
);

At this point, you can use standard GraphQL queries:

query ListEvents {
listEvents{
items{
__typename
id
name
where
when
description
comments{
__typename
items{
__typename
eventId
commentId
content
createdAt
}
nextToken
}
}
}
}

The example above shows a query with the sample app schema provisioned by AppSync. It not only showcases interaction with DynamoDB, but also includes pagination of data (including encrypted tokens) and type relations between Events and Comments. Because the app is configured with the AWSAppSyncClient, data is automatically persisted offline and will synchronize when devices reconnect.

You can see a deep dive of the client technology behind this and a React Native demo in this video.

Feedback

The team behind the libraries is eager to hear how these libraries and services work for you. They also want to hear what else we can do to make React and React Native development with cloud services easier for you. Reach out to the AWS Mobile team on GitHub for AWS Amplify or AWS AppSync.